Solar Tile Roof Mounting Installation, SPC-RF-IK01-DR
1.1Clean the Roman/clay/curved tile roof, and according to the size on the construction drawing,as picture 1 shows,
open the tiles where the hooks need to be installed, as picture 2 shows.


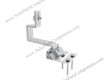
1.2 Put the stainless steel hook #1 on the installation position of the main beam, and fix the hook with three wood screws (ST6.3 * 80), as picture 3 shows,
After installation, as picture 4 shows.


1.3According to step 2, fix all the remaining stainless-steel hooks on the main beam according to the drawings. After installation, as picture 5 shows.

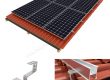
1.4 Use M8*25 clamp and bolt assembly to install the rail on the stainless-steel hook #1. As picture 6 shows.

1.5 Effect after installation.As picture 7 shows.


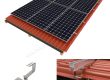
1.6 Use the rail splice for the connection between the rail and the rail, insert the connector into the groove on the inner side of the rail, insert 75mm on each side, and then lock the bolts, as picture 8 shows.
After installation, as picture 9 shows.


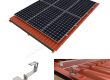
1.7 According to the above steps, connect the rails with rail splice first, and then install the rails on the hooks according to the construction drawings. After all the rails are installed, as picture 10 shows.

1.8 Put the panel vertically on the two rails, the installation sequence can be from left to right, from bottom to top, first press the solar panel by hand to prevent the panel from sliding down, as picture 11 shows.

1.9 Use the end clamp to lock the side of panels, screw the sliding nut on the end clamp to the bottom of the bolt, and then put it sideways into the groove of the rail, as picture 12 shows.
After install the end clamp, as the picture 13 shows.


2.0 The installation of the mid clamp is the same as that of the end clamp. First, screw the sliding nut on the mid clamp to the bottom of the bolt, and then put it sideways into the groove of the rail, as the picture 14 shows.
After install the mid clamp, as the picture 15 shows.


2.1 According to the above steps, use the mid clamp to install the panels from left to right, as the picture 16 shows.

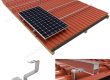
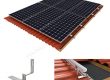
2.2 After the overall installation as the picture 17-18.

More Good Quality Mounting Component Series can be reached at : www.SolarPartsComponents.com