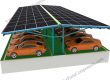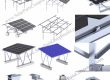
Installation steps for PV panel pole mounting system, SPC-HA-4H-PCW
Step 1:Install the connector
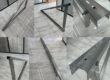
Pole joints and diagonal brace joints are generally packed in cartons when shipped. After the I-steel pole is driven into the soil according to the construction drawings, install the joints at the joints of the purlin and the poles and the joints at the joints of the diagonal braces and the poles on the pole. Specific steps as follows.


Step 2: Pre-assembly and installation of purlin
When shipping, the factory has pre-assembled the purlin, jackets, columns, and grounding screws with bolts. After the bracket arrives on site, only need to open the pre-assembly, rotate the square tube in the direction on the drawing, and then remove the pre-assembled Bolts, lock the square tube on the base, and finally tighten all the bolts with a torque wrench.


Step 3 Adjust the purlin pre-assembly
According to the above steps, all the purlin are pre-assembled and installed on the ground screws. Note that after all the purlin are pre-assembled and installed on the poles, the front ends of the purlin should be on the same line. The upper surface of the stringer also needs to be on the same plane. If it is not on the same plane, you can loosen the bolts at the joints, fine-tune the pre-assembled bracket up and down, and then tighten the bolts after adjusting to the same level.

Note:
If the pole is skewed during the piling process, after the installation pre-assembly is completed, it is not parallel to the other pre-assembly, you can rotate the pre-assembly to be parallel to the other pre-assembly through the joint


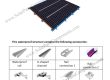
Step 4 splicing beams
The steps of rail connection are as follows:

Step 5 Determine the position of the beam on the purlin
According to the construction drawings, first connect two L4900 rails according to the above rail connection method. Then the cantilever is exposed by 700mm, and the distance between the front and rear of the purlin is 124mm, and then install a whole rail at an interval of 1013mm. The fixing method of the beam and the purlin is shown in the figure below


Step 6 Fix the beam
The beam is fixed with a crossbeam. There is a slot at the bottom of each rail. First put the spliced ??rail on the purlin. The placement position is as above. Put the pressure block sideways into the groove in the middle of the purlin, and then press the block Press down the groove at the bottom of the beam, and then use an Allen key to lock the pressure block tightly, press a beam fixing piece on each side of the rail

After the beam is fixed, the following picture is shown:

Fix the remaining 4 splicing rails on the purlins according to the above installation steps. After the installation is completed, the following picture is shown:

Step 7 install solar panels
According to the construction drawings, we can see that the solar panels are placed horizontally on the rail, from bottom to top, from right to left, or in the opposite direction. The solar panel frame on the outermost side exposes the rail 45mm, and the distance between the horizontal panels is 10mm. The position of the mid /end clamp is 940mm in the center, or adjust the position of the mid /end clamp according to the site


Step 8 Fix the solar panel with mid/end clamp
The solar panel is fixed by mid/end clamp, the two rails are fixed by end clamp, and the middle 3 rails are fixed by mid clamp . When installing, you only need to press the mid/end clamp to the side so that the block is locked into the groove of the beam, without sliding in from the side of the rail. There is a grounding clip on the mid clamp. The grounding clip needs to be pressed between the rail and the panel, and the bumps on the grounding clip can pierce the surface of the rail to conduct electricity.


Step 9 Fix the grounding clip
Use self-tapping screws to fix the grounding clip on the bottom of the rail, install one on each beam, and install each grounding clip in the same position. Then pass the copper wire through all the grounding clips, tighten the M6 ??bolts on the side of the grounding clip, fix the copper wire on the grounding clip, and finally lead the copper wire into the ground.

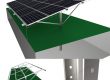
After the overall installation is complete, the following figure


More Good Quality Mounting Component Series can be reached at : www.SolarPartsComponents.com