Step 1: Install columns and stringer
1.According to the column installation position diagram, suggest that fix each column with four M20 anchor screws. The distance between anchor bolt holes is 150 x 150mm. After the column be mounted, exposed 70mm of the anchor bolts above the ground , secured with double nuts.

- Fix the four columns according to the dimensionsabove, NOTE that the boards of the stringer are outwards, as shown below:

3.Install the stringer. Fix the stringer onto the column with 8 pieces of M12*35 bolts, and the stringers are fixed together with 6 pieces of M12*35 bolts, as shown below:

- Install the horizontal and vertical pull rods. Install two vertical and two horizontal pull rods on each column.

Step 2 Install beams
- Install the beam baffle. Install the baffle on the stringer with 2 pieces of M12*35 bolts.

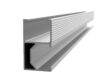
2.Install beams. The side of C180 is fixed on the baffle plate with 4 pieces of M12*30 bolts, and the bottom is fixed on the stringer with 2 pcs of M12*35 bolts, as shown below:

3.Install w-type water channel, place it according to the following size, and press the W-type water channel in the C-type steel inner groove with C-type buckle at the bottom.

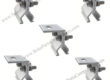
4.Install the clamps. Installed 4 pieces of clamps on each W-type channel. Installed position of the clamp is shown below. If the quantity of clamps is small, the clamps can be installed on the W-type water channel first on the ground. Note that the clamp consists of two pieces, the nut is mounted on the side of the fixed groove. The nut will get stuck in the groove when the bolt is tightened.

- Follow the above steps to install the other side of the rails and W water channel.

- Install solar panels, rubber strips and horizontal water channel.
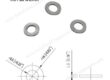
First, the solar panel is placed on the plate of the 4 pieces of clamps, and there is a certain gaps between the panels and the clamps to install the mid clamps. The distance between the upper edge of the panel and the upper edge of the W-type is 43.5mm. While the solar panel is placed, the horizontal channel and rubber strip are pressed under the panel. There is rubber attached to the w-shaped channel under the horizontal channel. The top of horizontal channel faces to the solar panel, and the center of the channel is under the frame of the panel.


- The solar panels are fixed with the mid and end clamps and equipped with the T-bolt. The T-bolt head is stuck in the groove of the clamp, and then the flange nut is fixed with the electric wrench tool with inner hexagon.


- Install all the solar panels according to the above steps.

- Install the ridge. The ridge is attached to the top horizontal channel, and the 6.7m ridge will be divided into 2-3 sections, each partially overlapping. The overlapping parts and the gaps between the roof and the solar panel are treated with glue.


- Install pedals. If the pedal needs to be transparent, it is made of glass, and the frame part is made to be the same thickness as the solar panel. The installation of the pedal is the same as that of the solar panel, and a rubber strip is installed between the pedal and the solar panel.
Install pedals. If the pedal needs to be transparent, need use glass , the thickness of the frame and the solar panel must be the same. The installation of the pedal is the same as the solar panel, and a rubber strip is installed between the pedal and the solar panel.

- Install the cover. The cover plate is installed above the mid clamps, and the middle hook part of the cover plate is buckled on the convex part inside the mid clamps.

- Install sink holders. The sink bracket is fixed in the front of W sink, and is fixed with two M10*65 trapezoidal nuts and bolts.

- Install the front sink. The front sink is placed directly on the sink holder, and one end of the front sink is clamped between the sink holder and the bottom of the sink. The other end is fixed on the sink tray with self-tapping screws. The side is fixed by tapping screws with sealing plates. The front sink will also be divided into several sections, overlapping parts and side sealed with glue.


14. Edge sealing.
After installation, the bottom of w-type water channel shall be sealed with aluminum plate according to actual measurement.

More details for this BIPV solar roof mounting system, please kindly check>>
More Good Quality Solar Mounting System can be reached at : www.SolarPartsComponents.com